
Spotify’s Authorization Code Flow For Dummies
It took me a long while to get authorization right for Melrady. This is a top-down view of how I got everything to a working state using Spotify’s Authorization Code Flow and Spotify Web API Node.
General Overview
Spotify provides this neat `lil chart for how exactly the Authorization Code Flow should go for your application, which is neat!
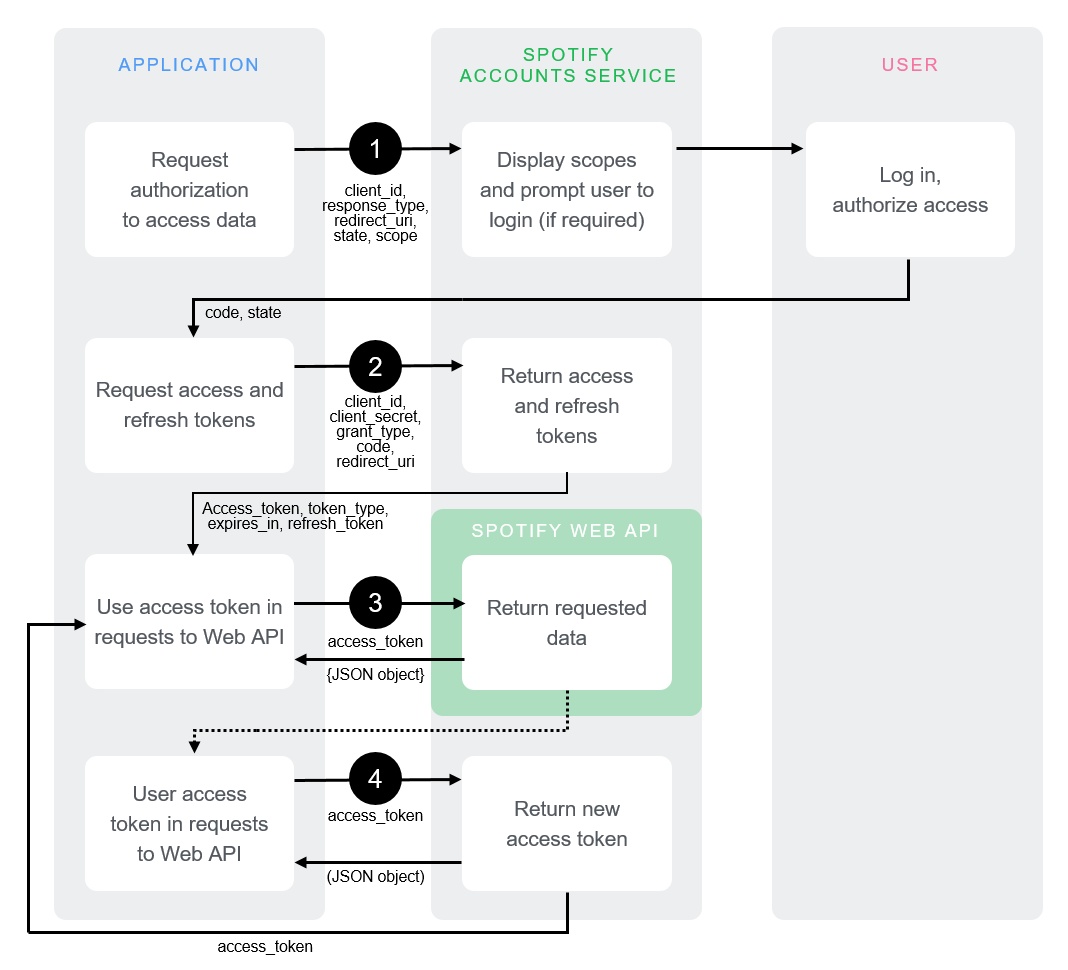
But to me, it wasn’t entirely straightforward on what you could expect during the whole process. I can’t cover every factor of how your app’s auth can/should/could be implemented, but I can at least provide a good gist of what you’ll be going through here.
Also, I think there’s some flaws in the chart. Particularly, it doesn’t mention refresh tokens and the bottom half is kind of unclear.
Here’s the overall flow:
- Have the user click a link that leads to a
/loginendpoint, which sends the user to a Spotify Account Login page - After logging in, the user is sent to whatever page you designated for the redirect in your link
- Spotify will send the user back with some special information in the request query
- Take the authentication code from the request’s query and covert it into access and refresh tokens
- Here you also validate a state variable for XSS safety reasons
- Store the access and refresh tokens somewhere. I place them in the user’s cookies, but you can utilize a different method like localStorage if you wish
- Make requests using the access token!
- The access token expires in an hour. The refresh token is used to generate a new access token from Spotify, without the whole user login ordeal
- Make Spotify API requests with your access token and refresh it when it expires in perpetuity
Now for the depth. The code will use Express, but this could be done with whatever server framework you wish (or none at all), as the concepts remain the same. The focus here is on the Spotify Node API usage and auth process.
Initial Setup
At the advent of everything here, you need to register an application on the Spotify For Developers Dashboard.
Making a dev account is breezy and free, and only involves you having a Spotify account already. Entirely self explanatory, once you try to get to the Dashboard.
Once you’ve got the dev account set up, your dashboard will look similar to this:
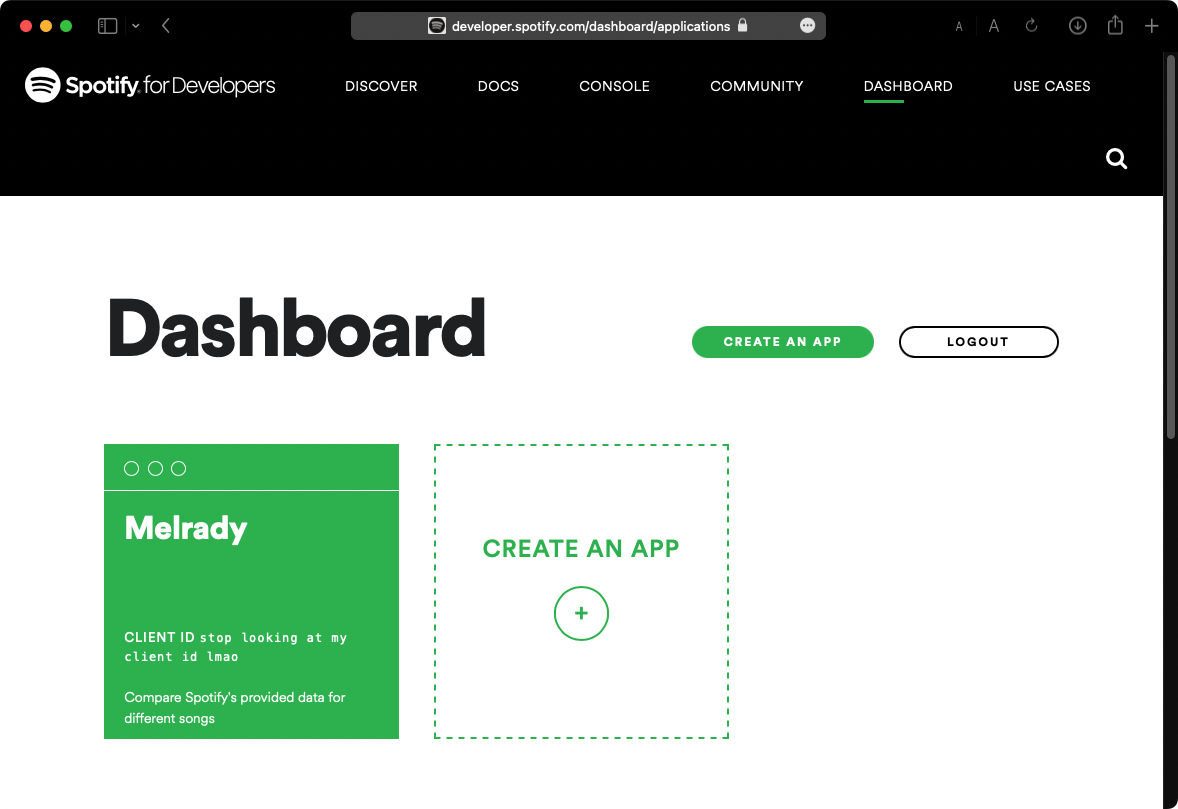
Tap the Create An App button, and provide whatever name and description you want for your app.
You’ll be taken to your app’s handy properties page. Here you tweak settings, get some usage statistics, and in the far/close future, request extended API access for your app.
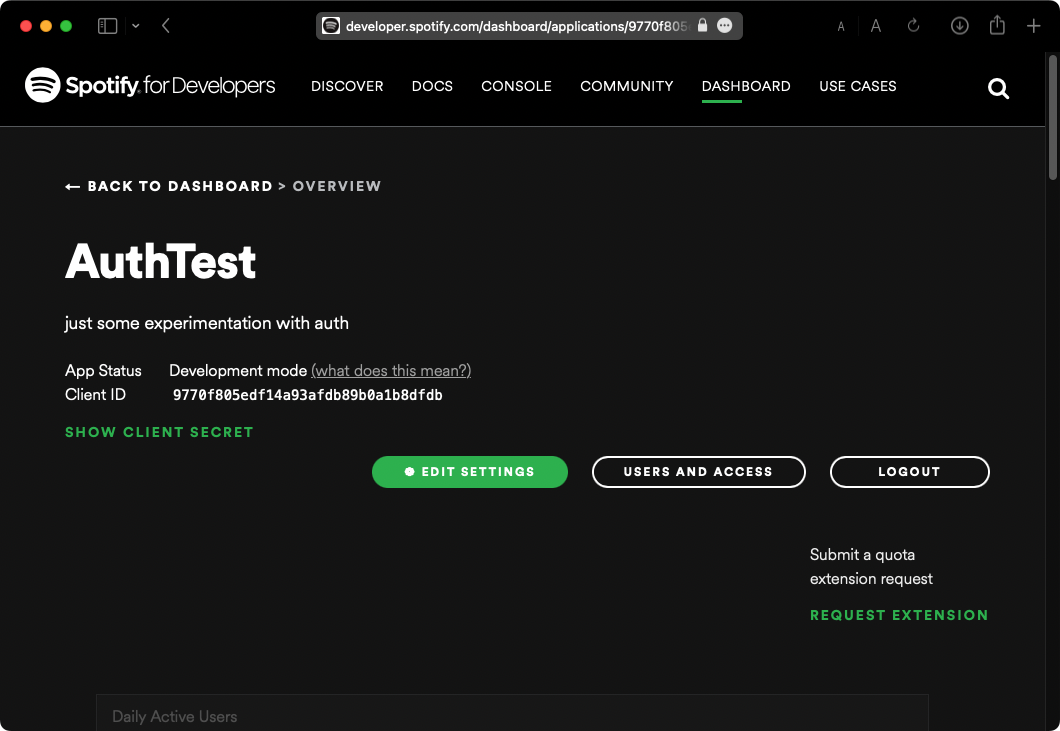
Click Show Client Secret to see your Client Secret. The name’s self explanatory; you should treat it as a secret!
Nowhere public. No git commits. We’ll put it in an env file, along with your Client ID.
Adding a Redirect URI
Click Edit Settings to open this modal:
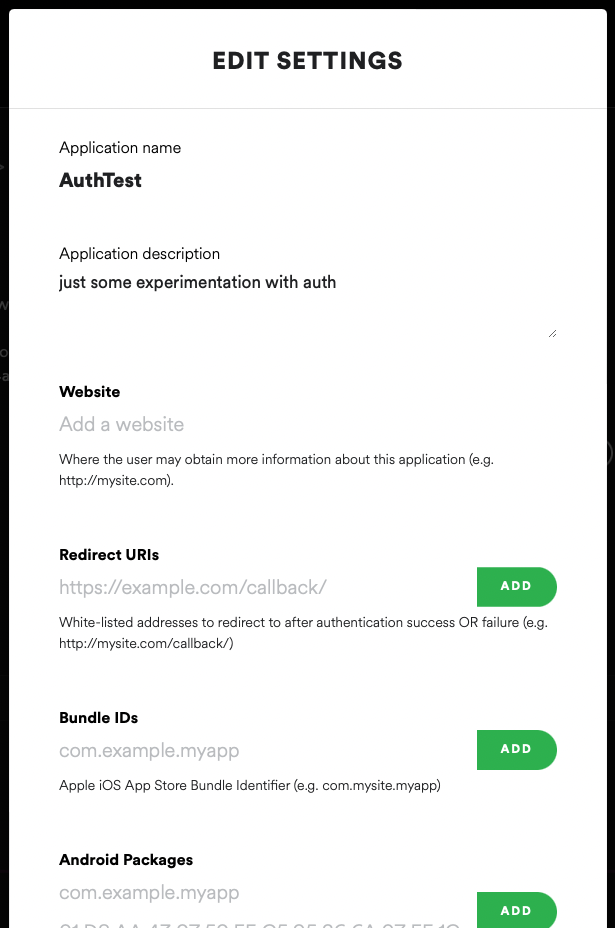
Add a localhost page to the portion where it says Redirect URIs, something like http://localhost:3000/redpage will do.
You can remove and add more as you wish, and you probably will wish once you’re making an actual site.
Adding the important bits to .env
PORT=3000
CLIENT_ID="your_client_id_here"
SECRET_KEY="your_secret_key_here"
RED_URI="http://localhost:3000/redpage"
If you know how to use .env files, I’m assuming you already know not to commit them. I did, once. Had to replace an entire repository. But if you don’t know how to use env files, have a quick read and remember to add it to your gitignore.
We have our Client ID and Client Secret in our .env file, and we’ve set a Redirect URI for our application. We can write code now.
Here’s your first look at our initial main.js
// init env
require("dotenv").config();
const PORT = process.env.PORT || 3000;
const CLIENT_ID = process.env.CLIENT_ID;
const SECRET_KEY = process.env.SECRET_KEY;
const RED_URI = process.env.RED_URI || `http://localhost:${PORT}/redpage`;
// We set RED_URI in process.env but have falsy alternatives set in place, just in case.

// This object is going to be used for authentication alone. We make separate SpotifyWebApis for our actual API calls with access tokens.
const SpotifyWebApi = require("spotify-web-api-node");
const spotifyAuthAPI = new SpotifyWebApi({
  clientId: CLIENT_ID,
  clientSecret: SECRET_KEY,
  redirectUri: RED_URI,
});

const express = require("express");
const app = express();
const cookieParser = require("cookie-parser");
app.use(cookieParser());
// Configure your app's routes/middleware/static pages/views+view engine here, if need be.
// app.use(...)

// The bits we're actually focusing on for the rest of the post.
app.get("/login", (req, res) => {});

app.get("/redpage", (req, res) => {});

const accTknRefreshments = (req, res, next) => {};

app.get("/faves", (req, res) => {});

console.log("authTest running on port " + PORT);
app.listen(PORT);
Logging In
The initial bit of your authorization code will be what leads the user to the Spotify page for the user to enter their login credentials, after which they get sent to the page you set as the Redirect URI with some important data for further usage.
More on the Spotify Login Page bit: for every user, we need to ask Spotify for an authorization code imbued with a set of permissions called Scopes, which allow our application to legally make requests to Spotify’s API with the user’s allowance in mind.
For demonstration’s sake, our sole scope will be user-top-read, which allows us to get a user’s Top Tracks and Artists.
The Spotify Node API has a method that creates a link that leads to the Spotify Account Login page with a set of requested scopes: createAuthorizeURL. All we really have to do is send the user to this location and wait for them to log in for us.
app.get("/login", (req, res) => {
  const scopes = ["user-top-read"];
  const loginLink = spotifyAuthAPI.createAuthorizeURL(scopes);
  res.redirect(loginLink);
});
“Optional” State Variable
Spotify highly recommends adding a state variable into the mix to avoid cross site attacks. What this means is that you’ll generate a random string of letters and numbers, length 16 preferred, and then add that random string to the user’s cookies and query string.
Later on in the redirect page endpoint, the state we passed to the authorization URL will be returned from Spotify and we check that against the user’s cookies to make sure it matches. If it doesn’t, we boot them.
createAuthorizeURL takes in state as an additional parameter:
app.get("/login", (req, res) => {
  const generateRandomString = (length) => {
    let text = "";
    let possible =
      "ABCDEFGHIJKLMNOPQRSTUVWXYZabcdefghijklmnopqrstuvwxyz0123456789";

    for (let i = 0; i < length; i++) {
      text += possible.charAt(Math.floor(Math.random() * possible.length));
    }
    return text;
  };

  const stateString = generateRandomString(16);
  res.cookie("authState", stateString);

  const scopes = ["user-top-read"];
  const loginLink = spotifyAuthAPI.createAuthorizeURL(scopes, stateString);
  res.redirect(loginLink);
});
That’s it for the /login endpoint.
Spotify Login to Redirect Page
At this point the user’s hit the /login endpoint, which sends them over to a Spotify page that looks like this (once they’re logged in):
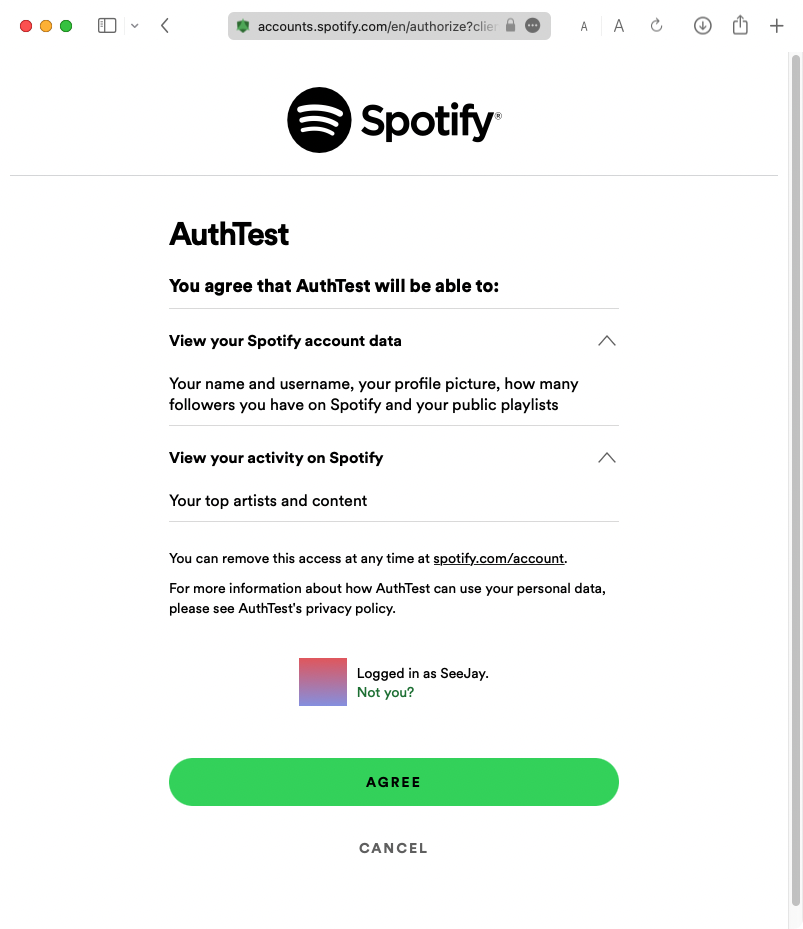
After the user so-expertly clicks Agree, they’re sent back to the page that was previously designated as the RED_URI at the beginning of main.js.
Spotify jets them to /redpage with some important bits of information in the request query: the Authentication Code and State Variable. In Express, you can access these easily through the req.query object.
Checking the State Variable
That bit of state we passed into the authentication link function is relevant now. The first step for our redirect endpoint is to check the state against the user’s cookies and send them away if it doesn’t match for some reason.
app.get("/redpage", (req, res) => {
  if (req.query.state !== req.cookies["authState"]) {
    // States don't match, send the user away.
    return res.redirect("/");
  }

  return res.status(200).send("placeholder for the bright future");
});
Getting Access and Refresh Tokens
The central tidbit the user’s been sent to our redirect page with is the Authentication Code, accessible via req.query.code.
We turn the authentication code into access and refresh tokens by passing it into the Spotify Node API’s authorizationCodeGrant, which returns a promise that yields the tokens. We place these in the user’s cookies for convenience.
app.get("/redpage", (req, res) => {
  if (req.query.state !== req.cookies["authState"]) {
    // States don't match, send the user away.
    return res.redirect("/");
  }

  res.clearCookie("authState");

  const authenticationCode = req.query.code;
  if (authenticationCode) {
    spotifyAuthAPI.authorizationCodeGrant(authenticationCode).then((data) => {
      res.cookie("accTkn", data.body["access_token"], {
        maxAge: data.body["expires_in"] * 1000,
      });
      res.cookie("refTkn", data.body["refresh_token"]);

      // poor man's JSON visualizer.
      // You should stay here or redirect to another page instead of including this bit.
      return res
        .status(200)
        .send(`<pre>${JSON.stringify(data.body, null, 2)}</pre>`);
    });
  }
});
When all’s said and done,
- Hitting
/loginshould send users to the Spotify Login page, - which redirects them to
/redpagewith the authorization code in the URL, - which is exchanged for access and refresh tokens in an object that’ll look like this:
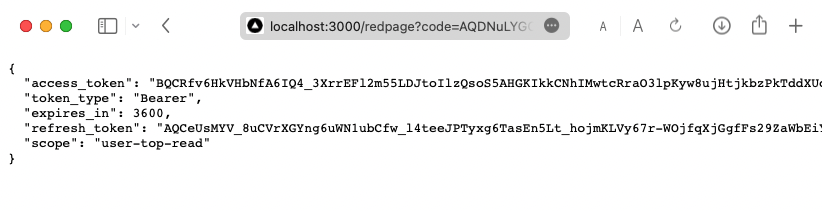
The page doesn’t have to be anything like this, it’s just for the sake of visualizing what you’re given when doing the token exchange.
At this point, you’re free to do whatever you want with the user and their access token. Use the access token then and there on the redirect page, send them around your site, anything your heart desires. The access token’s in the cookies, so there shouldn’t be much difficulty in using it in your app. localStorage is an alternative to cookies I’ve seen in use here and there as well.
Using the Refresh Token
Usage of the access token is pretty straightforward from the Spotify Web API Node README.
But see that bit in the last code block where we set the access token cookie, { maxAge: data.body["expires_in"] * 1000 })?
That’s the access token’s expiry date. Spotify invalidates access tokens an hour after they’re issued, for security reasons.
We multiply the number provided in the response by 1000 because Spotify stores
expires_inusing seconds.
So an hour after the user logs in, any API calls you make will cause errors they can’t resolve until they’re logged out/clear cookies. Not great.
But refresh tokens are forever! For API endpoints that make requests to Spotify’s API with an access code, I use a bit of middleware that checks the user’s cookies for an access token. If one isn’t located, it asks Spotify for a new access token using the refresh token. If there’s no refresh token, the user’s sent back to /login.
const accTknRefreshments = (req, res, next) => {
  if (req.cookies["accTkn"]) return next();
  else if (req.cookies["refTkn"]) {
    spotifyAuthAPI.setRefreshToken(refresh_token);
    spotifyAuthAPI.refreshAccessToken().then((data) => {
      spotifyAuthAPI.resetRefreshToken();

      const newAccTok = data.body["access_token"];
      res.cookie("accTkn", newAccTok, {
        maxAge: data.body["expires_in"] * 1000,
      });

      return next();
    });
  } else {
    return res.redirect("/login");
  }
};
The Light at the End of the Tunnel: Making an API call
I don’t intend this to be a guide on how to use everything the Spotify Node API offers, but I could at least demonstrate a nice API request route that makes use of our refresh middleware and previously requested scope.
app.get("/faves", accTknRefreshments, (req, res) => {
  const spotifyAPI = new SpotifyWebApi({ accessToken: req.cookies["accTkn"] });

  // query Spotify's top tracks endpoint for a user API, with a max track count of count and time range
  // extended over the user's entire account
  count = 12;
  spotifyAPI
    .getMyTopTracks({ limit: count, time_range: "long_term" })
    .then((data) => {
      return res
        .status(200)
        .send(`<pre>${JSON.stringify(data.body.items, null, 2)}</pre>`);
    });
});
You can see that we initialize a new Spotify API object with the access token for each request. We shouldn’t use the spotifyAuthAPI object for this case, as setting/unsetting the access token and making API requests with it could get messy. This method keeps access tokens isolated for the user.
For a while I had a naively goofy solution where I did reuse the auth object by wrapping the calls in a function that would set and unset the access token between API usage, inspired by an auth example I saw on a Glitch playground.
It made code a lot more complex, and was overall less secure. And looking back at it now, ‘twas just plain dumb.
Assuming nothing’s failed horribly, you should get a bunch of data related to your favorite tracks:
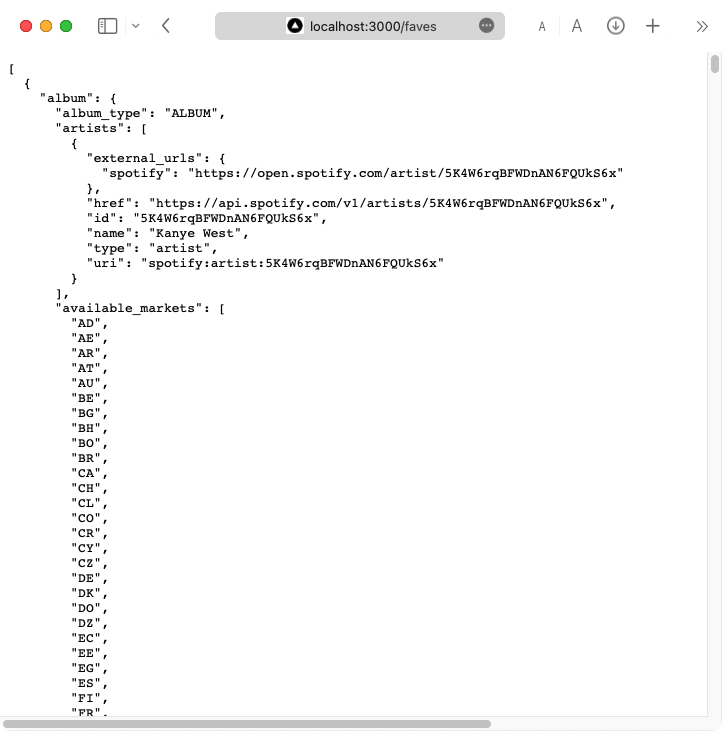
(The picture doesn’t do it justice at all, Spotify sends a lot of data!)
Conclusion
Overall I hope this helps anyone a bit, even if it’s a pretty niche topic. I only wrote so much because auth was a complex issue for me at the time, and I spent a lot of time refactoring it as my understanding grew. Time that I’d have liked to save.
It’s not a full web app guide, just the authorization bits that you’ll need.
Thanks for reading!
If you’re wondering, no this isn’t exactly how Melrady’s auth works. It very much utilizes the same base concepts, but the logic is somewhat different. For example, I have everything auth related in a single piece of middleware. You can check it out on GitHub.